Textured Acrylic Painting Techniques for Depth and Emotion
When you hear "textured painting," you're really talking about using acrylic paint, special mediums, or even just clever tool work to build a physical, three-dimensional surface on the canvas. It’s a way to move beyond flat color, adding real depth and a tactile quality that makes a piece of art feel much more alive and dynamic.
This guide is your starting point for learning the foundational techniques that can transform your paint from a simple liquid into a tangible, touchable experience.
Why Artists Embrace Textured Painting
Moving beyond a two-dimensional surface completely changes the game. Texture isn't just a visual trick; it's a direct line for communicating raw emotion and energy. Think about it—the rough, gritty surface of a rock or the smooth, glassy crest of a wave can be physically sculpted into your painting, inviting viewers to connect with the art on a much deeper, more sensory level.
This isn't a new idea, of course. The modern roots of this approach go way back to the 1930s with artists like David Alfaro Siqueiros. He was a true innovator, experimenting by mixing pigments with sand and resin, and his work influenced generations of artists. If you want to dive deeper into the history, Rise Art's guide to acrylic paintings is a great resource. The enduring appeal of these methods is clear—textured acrylics now make up a huge part of the global art materials market.
Building a Deeper Connection with Viewers
Texture adds a narrative layer that color alone just can't quite capture. It can conjure feelings of calm, chaos, or nostalgia, turning a simple scene into a compelling story.
When a viewer can actually see the shadows cast by thick, sculptural peaks of paint, they are drawn into the work in a more profound way. That physical presence makes the artwork feel like a living, breathing piece within a space.
By incorporating texture, an artist can quite literally guide the viewer's eye and set the emotional tone of a piece. A heavily textured area might scream with raw energy, while a smoother, softer passage can create a sense of deep tranquility.
The Benefits of Adding Dimension
Adding real physical depth to your work opens up some exciting advantages, especially if you're looking to refine your personal style.
- Increased Expressiveness: Thick, decisive, gestural strokes are fantastic for conveying movement and passion.
- Enhanced Realism: You can mimic natural surfaces like tree bark or sand, adding a believable, tangible quality to your art.
- Unique Artistic Voice: Getting comfortable with textured acrylic painting techniques is one of the best ways to develop a signature style that truly stands out.
Ultimately, texture can amplify the psychological impact of your color palette, creating a more cohesive and powerful final piece. Understanding how hues and physical surfaces work in harmony is key, a concept we explore further in our guide on color psychology in interior design.
Choosing Your Tools for Creating Texture
The secret to creating captivating texture in acrylic painting isn't just about technique; it starts with the materials you choose. Getting this right from the beginning is what separates a flat, uninspired piece from one that has real physical and emotional depth. The tools and paints you select will directly shape your final result, giving you everything from subtle, rolling waves to dramatic, sculptural peaks.
Think of your paint as the starting point. Heavy body acrylics are a fantastic choice for building up thick, buttery layers. They're dense enough to hold the marks of your brush or palette knife, which is perfect for impasto work. On the other hand, fluid acrylics are much thinner and more self-leveling, making them ideal for creating smoother gradients, washes, or even controlled drips. If you're new to the medium, our guide on how to start painting with acrylics is a great place to get your bearings.
Paints Versus Mediums
While the paint itself brings the color, it's the texture mediums that really let you build dimension. These are essentially colorless paints that you mix with your acrylics to change their consistency, drying time, or finish without diluting the pigment. They are the true workhorses of textured art.
A few of the most common options include:
- Gel Mediums: Available in various sheens (gloss, semi-gloss, matte) and thicknesses, gels are perfect for increasing transparency and creating smooth, flowing textures.
- Modeling Paste: When you want to build serious, high-relief effects, this is what you reach for. It’s a dense, opaque material that you can sculpt while it’s wet or even carve into once it's dry.
- Sand or Pumice Gels: These mediums come with fine aggregates already mixed in, giving you a gritty, granular surface that beautifully mimics natural textures like sand, stone, or weathered concrete.
To help visualize the options, this decision tree can guide you toward the right technique based on what you want to achieve.
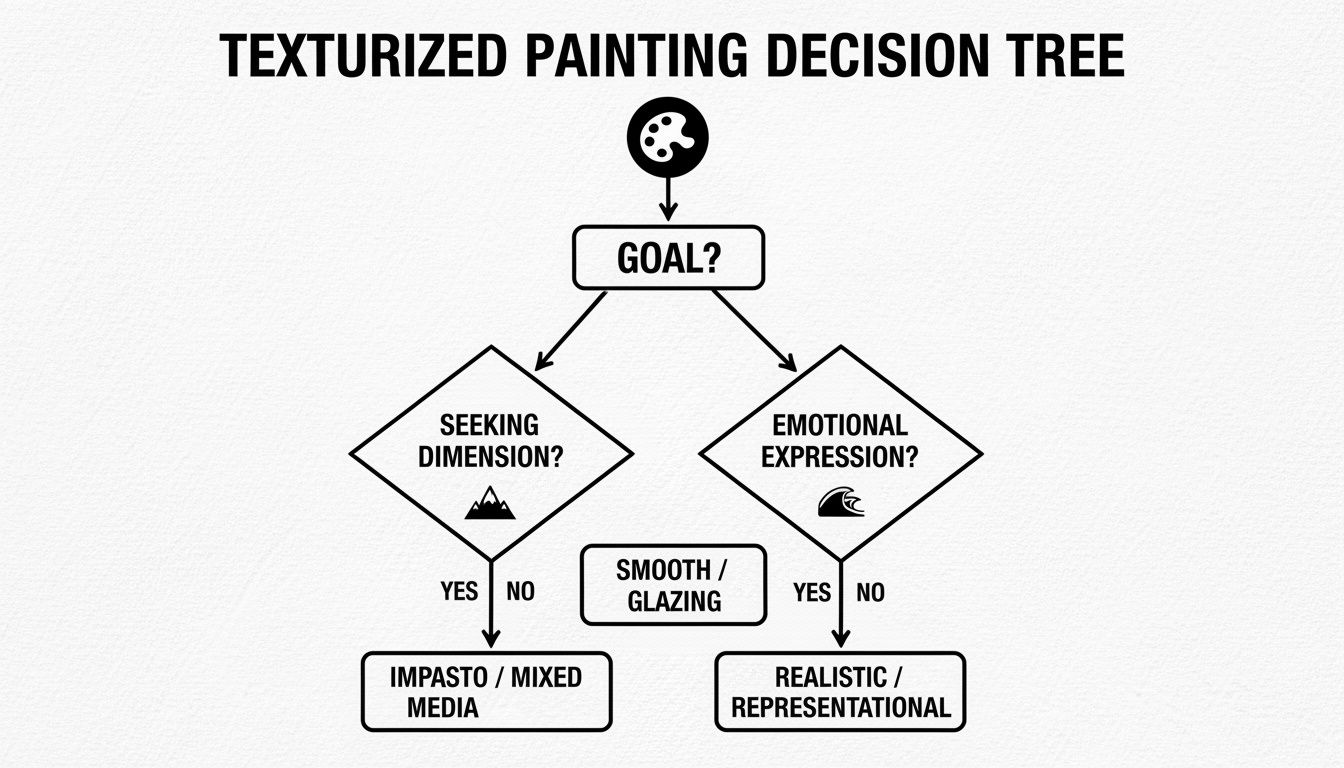
As the chart shows, your artistic goal—whether it's building physical depth, mimicking a specific surface, or conveying an emotion—should be the primary factor guiding your material choices right from the start.
Choosing Your Acrylic Texture Medium
With so many products available, it can be tough to know which medium will give you the effect you're looking for. This table breaks down some of the most popular options to help you decide.
| Medium | Primary Use | Consistency | Finish (Matte/Gloss) | Best For |
|---|---|---|---|---|
| Gel Medium | Increasing transparency & body | Smooth, varies | Both | Glazing, extending paint, subtle texture |
| Modeling Paste | Building heavy, rigid texture | Thick, paste-like | Matte | Sculptural effects, high peaks, deep impasto |
| Pumice Gel | Creating fine, sandy surfaces | Gritty, granular | Matte | Replicating stone, concrete, or beach sand |
| Glass Bead Gel | Adding a reflective, beaded look | Thick with beads | Gloss | Luminous effects, mimicking water droplets |
| String Gel | Creating long, linear textures | Honey-like, viscous | Gloss | Drip effects, fine lines, web-like patterns |
Ultimately, the best way to understand these mediums is to try them out. Each one has a unique feel and will interact with your paint and surface differently.
Brushes and Beyond
The tools you use to apply your paint and mediums are just as critical as the materials themselves. Stiff-bristled brushes are fantastic for impasto, as they leave behind those visible marks and ridges that add so much character.
For a completely different feel, a palette knife can create sharp, clean edges, smooth flat planes, and uniquely scraped textures that a brush just can’t replicate.
The development of these tools has a fascinating history. When heavy body acrylics hit the market in the 1970s, it was a game-changer. These new paints had a viscosity up to 70% higher than the fluid acrylics artists were used to, allowing them to build dramatic peaks straight from the tube with the fast-drying convenience acrylics are known for.
The right combination of paint, medium, and tool is where technique truly becomes art. A heavy body paint with a palette knife will create an entirely different emotional impact than a fluid acrylic applied with a soft brush and gloss gel.
Don't be afraid to experiment. There are no rules here. Try applying modeling paste with an old credit card or a scrap of cardboard. Use sponges, rollers, or even your fingers to push the boundaries and discover new textural possibilities. Each choice you make helps define your unique artistic voice.
Getting Started with Foundational Texture Techniques
Now that you have your materials ready, it's time to start bringing your vision to life. The following techniques are the essential building blocks for creating art with real physical depth. Each one offers a different way to handle your paint, letting you build everything from subtle, glassy layers to bold, sculptural forms that grab a viewer's attention.
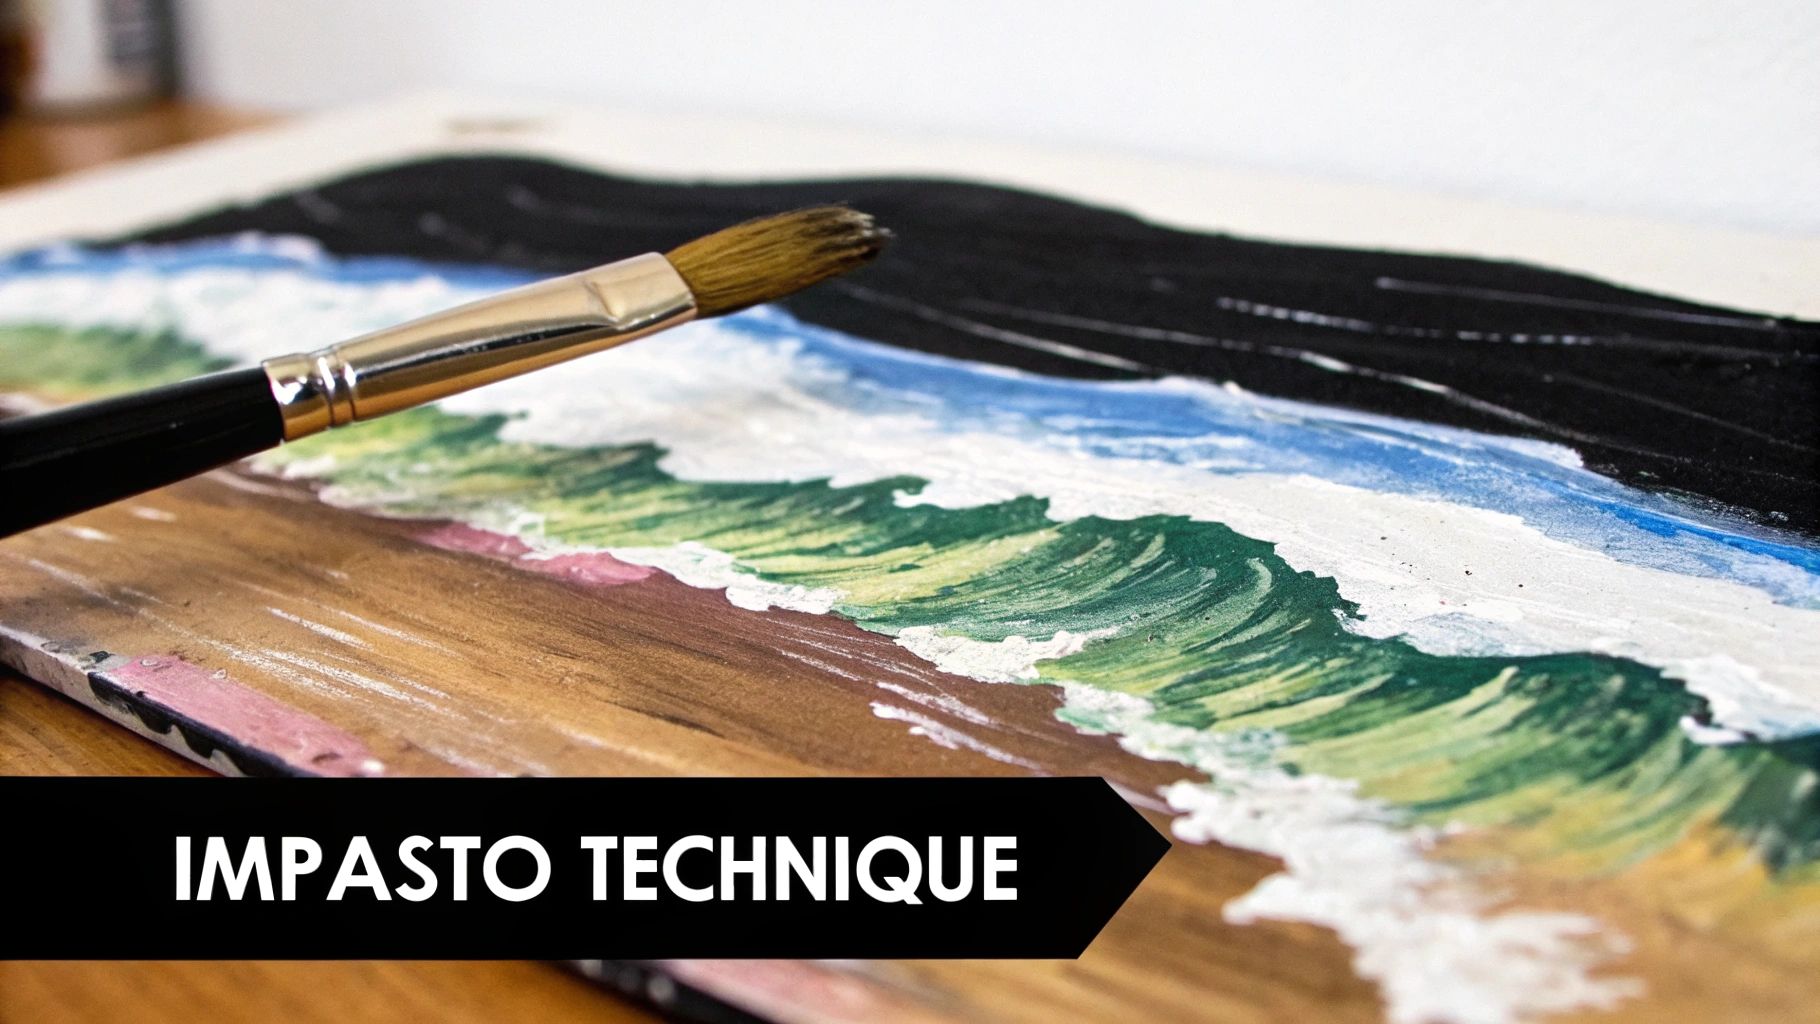
The Art of Impasto
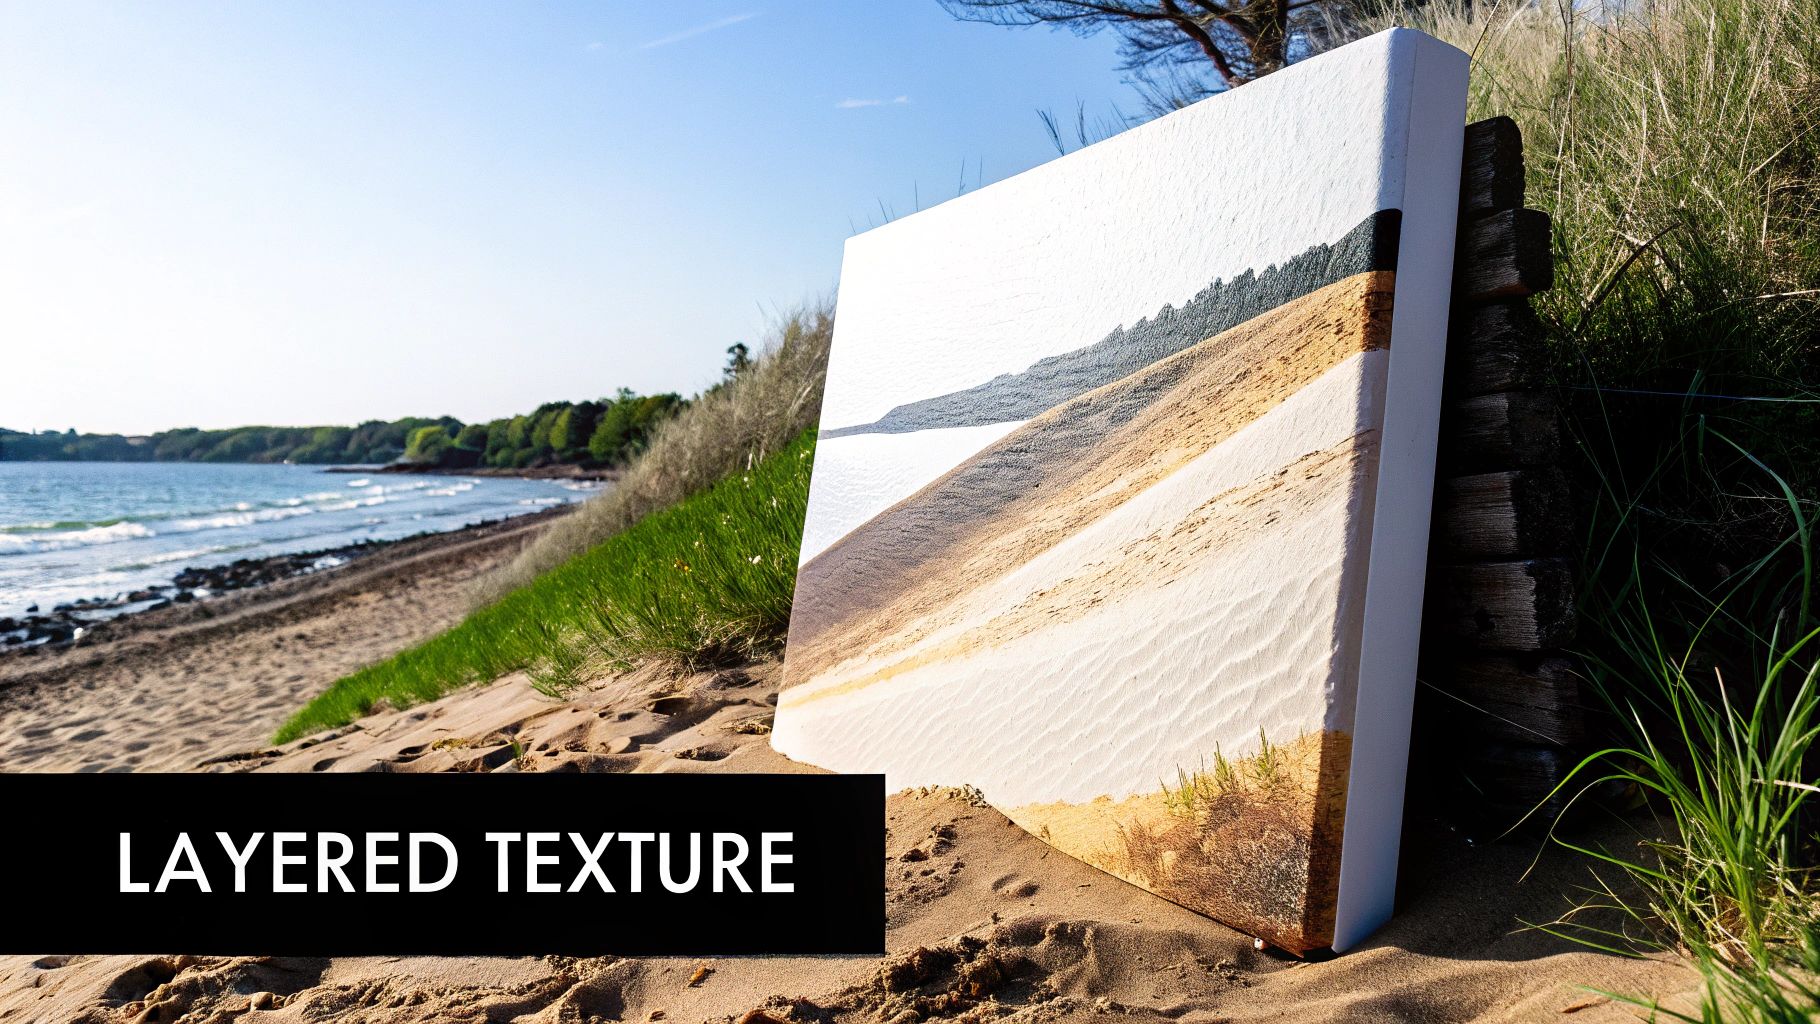
Impasto is probably the most famous texture method out there. It’s all about applying paint in thick, generous layers—often straight from the tube—so that every brush or knife stroke remains visible after it dries. This isn't a technique for subtle effects; it’s for creating a bold, almost sculptural surface that plays with light in fascinating ways.
Those thick peaks and valleys of paint cast their own shadows, giving the artwork a tangible, physical presence. It’s the perfect way to convey raw energy and movement, which is why so many artists use it for turbulent seas or dramatic landscapes. Imagine a thick, upward slash of white heavy body acrylic—it’s the ideal way to capture the powerful spray of a crashing wave.
Painting with a Palette Knife
While brushes are fantastic for creating expressive, gestural marks, a palette knife opens up a whole different world of possibilities. With this tool, you can lay down broad, flat fields of color or carve out sharp, clean edges that you just can't get with bristles. It’s my go-to method for building up geometric shapes or suggesting the hard, flat planes of a cliff face.
You can use the flat side of the knife to sweep a thick layer of paint across the canvas, creating a smooth, unified block of color. Or, try using the knife's edge to slice into wet paint, revealing the colors underneath or carving in fine lines. The amount of pressure you apply gives you total control, from a gentle blend to an aggressive scrape. Getting a feel for these subtleties is a huge part of learning how to create texture in paintings.
Working with a palette knife forces you to be decisive. Every mark feels like a commitment, and that can bring a powerful sense of immediacy and confidence to your work. It's less about rendering tiny details and more about capturing the raw energy and essential form of your subject.
Building Form with Modeling Paste
When you want textures that leap off the canvas—forms that paint alone just can't create—modeling paste is your best friend. This thick, opaque medium can be mixed with your acrylics or applied straight to the surface and painted over once it's dry. It's surprisingly lightweight and flexible, so you can build up really substantial layers without worrying about cracking or making the canvas too heavy.
Think of modeling paste as a sculptural clay for your canvas. You can trowel it on with a knife to create mountain ridges or use tools to carve into it while wet, mimicking the intricate patterns of tree bark. Once it hardens, you’re left with a rigid, absorbent surface that’s perfect for painting on.
Here are a few ways I use modeling paste in my own work:
- Creating a Foundation: I often apply the paste first to build the main shapes of my composition before I even touch my paints.
- Mimicking Natural Surfaces: Mixing in a little sand or fine gravel gives you a gritty, realistic texture for beach scenes or rocky terrain.
- Carving and Sanding: After it has fully cured, modeling paste can be sanded down for a smooth finish or carved into with sharp tools for highly refined details.
Using Gel Mediums for Translucency
While modeling paste is for building opaque, solid forms, gel mediums are the secret to creating translucent, layered textures. Gels are essentially acrylic paint without the pigment. You mix them with your colors to make them go further, increase their transparency, and change their consistency without weakening the color.
This is the technique you want for creating a sense of depth and light. For instance, you could apply a thin, glossy layer of gel mixed with a tiny bit of blue over a textured white area to create the beautiful illusion of shallow, sunlit water over sand. Where impasto is about bold physicality, working with gels is a more delicate process of building depth through glassy, luminous layers.
Each of these foundational techniques gives you a unique language for expressing yourself with texture. The real magic happens when you start to understand how they can work together, combining them to create complex, compelling surfaces that truly tell a story.
Creative Combinations and Advanced Methods
Once you've got a handle on the foundational techniques, the real fun begins. This is where you start to push beyond simply following steps and develop your own artistic voice. Advanced textured work is all about layering different approaches, blending unexpected materials, and discovering what a painting can truly become.
Think of it as building a history on the canvas. A bit of dry brushing over a palette knife peak, a sgraffito line scratched into a layer of modeling paste, a piece of gauze embedded in gel medium—each action tells a part of the story. The final piece ends up being so much more compelling than what any single technique could accomplish on its own.
Creating Weathered Surfaces with Dry Brushing
Dry brushing is one of my favorite ways to add a subtle, weathered feel to a piece. It’s a beautifully simple method: take a stiff, dry brush, load it with a tiny amount of thick paint, and then wipe most of it off on a paper towel. All you need left is a whisper of pigment.
Now, just lightly skim the brush over an already-textured surface. The paint will only catch on the highest peaks, leaving the valleys untouched. This is incredibly effective for making impasto strokes pop or for highlighting the gritty surface of modeling paste. Imagine a light scuff of white paint over a dark, craggy base—it instantly creates the look of sea salt drying on a coastal rock.
Carving Details with Sgraffito
Sgraffito, from the Italian word "to scratch," is a fantastic subtractive technique. You’re essentially carving or scratching through a wet layer of paint to reveal the dry, contrasting color beneath. It’s the perfect way to introduce fine lines or intricate patterns into a thick field of paint.
To give it a go, lay down a thick coat of acrylic over a completely dry base layer of a different color. While that top layer is still wet, grab a sharp tool—the tip of a palette knife, a bamboo skewer, even the wrong end of a paintbrush—and draw right into it. You'll get these crisp, embedded lines that feel like a natural part of the texture. I find it works beautifully for suggesting blades of grass or the delicate veins in a leaf.
Sgraffito is really drawing with your painting. It brings a direct, immediate kind of mark-making to the canvas that feels both spontaneous and precise, giving you a unique way to weave linear details into a heavily textured surface.
Bringing in Collage and Assemblage
If you want to create the ultimate mixed-media piece, look no further than collage and assemblage. This is where you start bringing non-paint materials directly onto the canvas, pushing your work into a truly three-dimensional space that blurs the line between painting and sculpture.
The key is to use materials that resonate with your subject. For my seascapes, I often turn to things like:
- Sand and Shells: Mixing real sand into a gel medium or embedding crushed shells creates an immediate, authentic connection to the coast.
- Fabric and Paper: Scraps of cheesecloth, gauze, or handmade paper can be pressed into wet paint to build up delicate, layered surfaces.
- Found Objects: I'll often use small pieces of driftwood, twine, or even rusted metal fragments, attaching them with a heavy gel medium to add a sculptural, almost narrative, element.
When you're layering such diverse elements, a strong adhesive is non-negotiable. I rely on a heavy gloss gel medium; it acts as an industrial-strength glue and dries perfectly clear. Combining these methods is how you build work with incredible depth and personality. It’s a core part of my process for painting seascapes with acrylics, where capturing the raw energy of the ocean is everything.
How to Varnish and Frame Your Textured Art
You’ve laid down the final brushstroke and built up incredible texture. It’s a great feeling, but the journey isn't quite over. The final steps—protecting and presenting your work—are what elevate a finished canvas into a professional, lasting piece of art.
Varnishing is your first line of defense. It’s a non-negotiable shield against dust, grime, and the damaging UV light that inevitably fades pigments over time. With textured art, this step demands a bit more finesse. Because of the peaks and valleys on your canvas, a heavy-handed application can cause the varnish to pool in the crevices, creating a messy, uneven finish.
Choosing the Right Finish
The varnish you choose is an artistic decision in itself, one that can dramatically shift the mood and final look of your textures. Think carefully about what you want to emphasize.
- Gloss Varnish: For a wet, highly reflective look that makes colors incredibly rich and saturated, gloss is the way to go. It catches the light in a way that makes every ridge and groove pop with dynamic energy.
- Matte Varnish: If you're looking for a contemporary, non-reflective surface, a matte finish is perfect. It’s fantastic for eliminating glare, giving the art a softer feel, though be aware it can slightly dull the deepest, darkest colors.
- Satin Varnish: This is the happy medium. Satin offers a subtle, low-sheen luster that gently enhances color and texture without the intense shine of a full gloss finish.
A pro tip for varnishing a piece with significant texture: first apply a thin "isolation coat." I mix a soft gel gloss medium with a bit of water and brush it on. This creates a permanent barrier between the paint and the final varnish, evening out the surface and making it much safer to remove the varnish for future cleaning without disturbing your painting.
Framing to Showcase Depth
When it comes to framing textured art, the frame should complement the work, not compete with it. Your goal is to accentuate the three-dimensional quality you spent so much time creating. A common pitfall is selecting a conventional frame whose inner lip presses against the canvas, which can easily crush or chip the fragile peaks of your paint or modeling paste.
The floater frame is almost always the best choice here. This style creates a small, deliberate gap between the edge of your canvas and the inner part of the frame, giving the impression that the artwork is "floating" inside.
This presentation beautifully highlights the depth of the canvas edges and reinforces the painting's physicality. For heavier or larger works, ensuring it's mounted securely within the frame is crucial. We cover the specifics of that in our guide on how to hang large canvas art. Ultimately, the right frame honors the texture and puts the final, defining touch on your artistic statement.
Common Questions About Textured Painting
When you first start exploring the world of textured acrylics, a few questions always seem to pop up. It's completely normal. Getting a handle on how to troubleshoot these common hurdles is one of the best ways to build your confidence and get the polished, professional finish you're after. Let's walk through some of the most frequent queries I hear from artists just starting out with texture.
How Do I Stop Thick Paint from Cracking?
It's a classic problem and a frustrating one: you sculpt a perfect, thick peak of modeling paste, only to come back later and find it riddled with cracks. What's going on? Usually, this happens when a very thick layer of paint or medium dries too quickly on the outside while the inside is still wet. That tension is what causes the surface to fracture.
The most dependable fix is to simply build up your texture in several thinner layers. It takes a bit more patience, but letting each layer dry completely before adding the next one is key. Another great trick is to mix your modeling paste with a gloss medium; this adds flexibility to the paste and makes it far less likely to crack as it cures.
Can I Mix Different Brands of Paint and Mediums?
Generally, yes. For the most part, artist-grade acrylic paints and mediums from different reputable brands play very nicely together. They’re typically made with compatible acrylic polymer emulsions, so you shouldn't run into any major issues.
That said, I always recommend doing a quick patch test first. Before you commit a new brand combination to your actual painting, just mix a small amount on a scrap piece of canvas or paper. This lets you spot any weird changes in consistency, color shifts, or drying times. It’s a simple step that can save you from a lot of unexpected headaches down the road.
What Is the Best Surface for Heavy Texture?
When you're working with a lot of heavy material—think thick layers of modeling paste or gobs of impasto—your choice of surface is incredibly important. A standard stretched canvas just can't handle the weight and will often sag or warp over time, which can ruin your hard work.
For heavily textured pieces, a rigid support is non-negotiable. I almost always use cradled wood panels or canvas boards because they provide far better stability and won't buckle under the strain.
These sturdy surfaces give your artwork the strong foundation it needs to last. And don't forget, no matter which surface you choose, always prime it properly with gesso to make sure your paint and mediums have something to grip onto.
At Skyler’s Art, every canvas tells a story through color and texture, capturing the emotive power of the natural world. Discover an original piece that speaks to you by exploring the full collection at https://skylers-art.org.