Painting Seascapes with Acrylics: painting seascapes with acrylics made easy
Before you can capture the raw energy of the ocean on canvas, you first need to assemble the right gear. The choices you make now, before any paint is even squeezed out, will fundamentally shape your work. It's less about having an arsenal of supplies and more about having the right tools that will work with you, not against you.
Success in painting the sea comes down to materials that can translate its motion and texture. This often means using heavy body acrylics to build up the physical form of a wave and fluid acrylics for the smooth, sweeping expanse of the sky.
Assembling Your Seascape Painting Toolkit
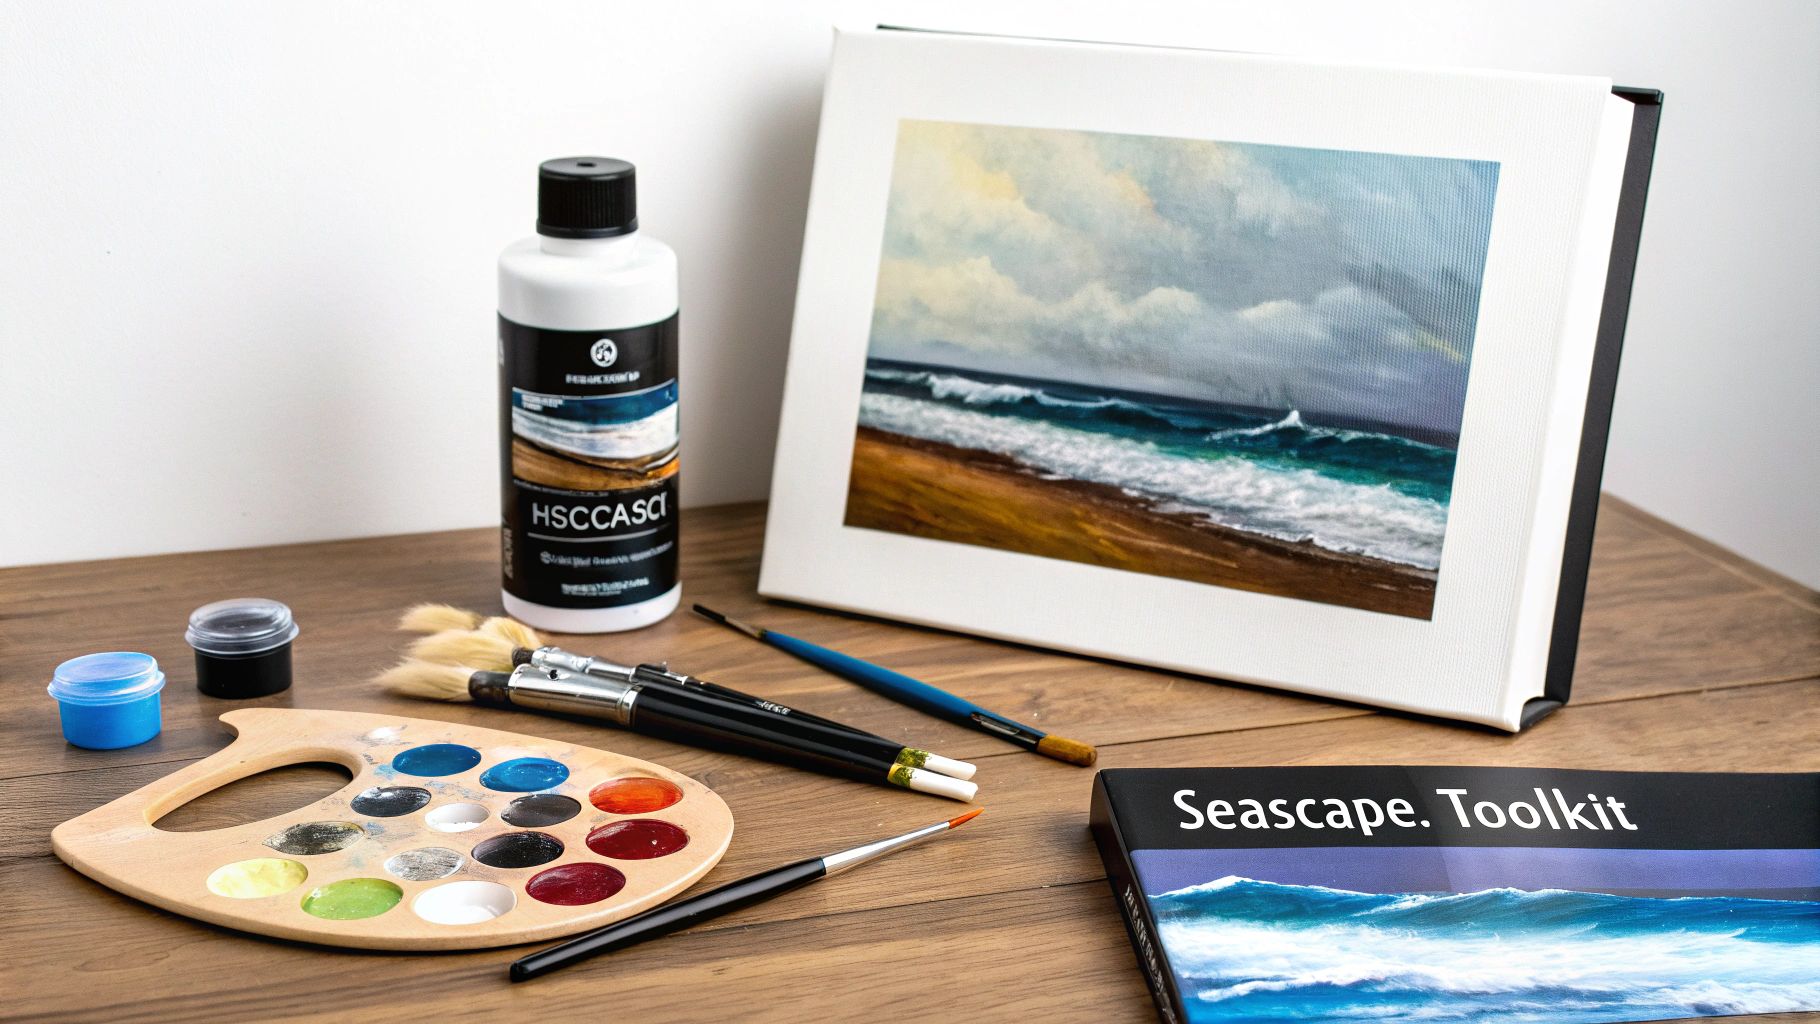
Many budding artists make the mistake of grabbing a generic starter set, but a more thoughtful approach will give you far more control. This isn’t about buying every color under the sun; it’s about carefully curating a toolkit specifically for the unique demands of seascape painting.
This focused mindset is reflected in the art world at large. The global market for art paint is projected to hit USD 5,302.47 million by 2035, a surge driven by a growing appetite for nature-inspired art. Acrylics lead the charge, commanding a 45% market share. Their fast-drying properties are perfectly suited for the layered, dynamic techniques needed to paint the ocean’s constant movement.
Choosing Your Acrylic Paints
The consistency of your paint—its viscosity—is critically important when tackling seascapes. I always keep two main types of acrylics in my studio:
- Heavy Body Acrylics: These have a thick, buttery feel, almost like soft butter. They're my go-to for creating physical texture. I'll use them with a palette knife to sculpt the crest of a wave or to build up the rugged face of a cliff. They hold their shape and every brushstroke, adding a tangible, almost sculptural quality to the work.
- Fluid Acrylics: With a consistency more like heavy cream, these are perfect for laying down smooth, even washes of color. I rely on them for skies, distant water, and creating subtle glazes. They allow for beautiful, seamless blending and layering, which is key for creating a sense of depth and atmosphere.
Having both types on hand means you’re equipped to handle the incredible range of textures a coastal scene presents, from misty sea spray to gritty, wet sand.
Building a Powerful Seascape Palette
I can't stress this enough: a limited palette is your greatest asset. It forces you to become a better color mixer and brings a natural harmony to your work. Too many tubes of paint just lead to confusion and, more often than not, muddy colors.
For instance, Phthalo Blue is a workhorse on my palette. It's a transparent, powerful blue that can range from a bright, tropical sky to the deepest parts of the ocean. When I mix it with Burnt Sienna—a rich, earthy brown—I can create an incredible spectrum of moody grays, deep blues, and atmospheric darks perfect for stormy weather or the shadows on wet rocks.
A curated palette is not a limitation; it is a strength. By learning the intimate relationships between a few key colors, you gain the ability to mix any color the ocean presents, ensuring unity and harmony in your final painting.
To get started, here is my curated list of essential colors that I believe provides the maximum range for expressive seascapes.
Essential Acrylic Palette for Expressive Seascapes
| Color Name | Primary Use in Seascapes | Mixing Notes |
|---|---|---|
| Titanium White | Wave crests, foam, sea spray, highlights, tinting | The most opaque white; essential for creating bright, impactful highlights and lightening other colors. |
| Phthalo Blue | Deep water, skies, shadows | A very strong, transparent pigment. A tiny amount goes a long way. Mix with Burnt Sienna for rich darks. |
| Ultramarine Blue | Skies, warmer water tones | A slightly warmer blue than Phthalo. Creates beautiful, soft sky gradients when mixed with white. |
| Cadmium Yellow Light | Sunlit water, highlights on waves, sandy tones | A bright, opaque yellow. Mix with blue for vibrant sea greens. Use sparingly for natural-looking light. |
| Burnt Sienna | Rocks, wet sand, creating moody grays and darks | An essential earth tone. Mixes with Ultramarine Blue to create a "chromatic black" that is more dynamic than tube black. |
| Permanent Alizarin Crimson | Sunset/sunrise skies, adding warmth to shadows | A cool, transparent red. Perfect for adding subtle warmth or creating violet tones when mixed with blues. |
This focused selection gives you the power to capture the ocean’s character with confidence. Mastering how these colors interact is a foundational skill, and you can explore more in our guide covering various acrylic painting techniques. When every hue works together, your painting will tell a more cohesive and powerful story.
Designing a Composition That Tells a Story
A great seascape is more than just a picture of the ocean; it’s an experience. It pulls the viewer in, and the way you arrange the elements on your canvas—the composition—is what makes that happen. This is the underlying structure that gives your painting its emotional punch and keeps the eye moving.
Before you even mix your first color, take a moment. What’s the story here? Is it about the quiet peace of a still morning, or the raw power of a crashing storm? Every decision you make, from where you place the horizon to the angle of a breaking wave, needs to serve that one central idea.
Finding the Heart of the Scene
Every powerful painting has a focal point—what I like to call the "heart" of the scene. It’s the one thing that grabbed your attention in the first place. Maybe it’s the brilliant flash of sunlight on the peak of a wave, a lone rock standing against the surf, or the shape of a dramatic cloud.
Once you know what that is, everything else on the canvas becomes a supporting actor. Your job is to make that focal point shine. Don't crowd the painting with too many competing details. If your reference photo has three equally interesting waves, pick one to be the star and let the others play a quieter role. This is the difference between simply copying a photo and creating a piece of art.
Using Foundational Compositional Tools
I'm not a fan of rigid rules, but some compositional guidelines have stuck around for centuries because they just plain work. Think of them less as rules and more as a reliable starting point for creating balance and flow.
- The Rule of Thirds: Picture a tic-tac-toe grid over your canvas. By placing important elements—like the horizon or a key wave—along those lines or where they cross, you almost always create a more interesting image than if you just stuck everything in the middle. Putting the horizon on the top third, for instance, gives all the attention to the sea, while placing it on the bottom third lets a big, dramatic sky take center stage.
- Leading Lines: Use the natural lines in the scene to lead the viewer’s eye right where you want it to go. This could be the curve of the wet sand, the path of foam pulling back into the water, or the lines of waves receding into the distance. It creates a visual journey and makes the painting feel much more immersive.
These ideas are all about arranging the visual weight in your painting. A huge, dark cliff on one side can be balanced by a bright, active sky on the other, creating a sense of harmony that feels right. If you want to dive deeper into this, you can learn more about related impressionistic painting techniques that really lean on these compositional ideas.
From Reference Photo to Artistic Vision
Your reference photos are a fantastic tool, but they are a starting point, not the final destination. A camera captures everything without bias. As an artist, you get to be the editor.
Do not become a slave to your reference photo. Its purpose is to provide information about light, form, and color. Your purpose is to infuse that information with emotion and intent, rearranging elements to strengthen the overall story.
Give yourself permission to make changes. If the sky in your photo is boring, invent one that adds to the mood of the water. Move that distracting rock or shift the angle of a wave to create a better line for the eye to follow. Your painting is your vision, a mix of what you see and what you feel. When you focus on the energy of the scene, you’ll create a seascape that tells a story and truly connects with people.
Bringing Your Seascape to Life Layer by Layer
Once your composition is mapped out, the real conversation with the canvas begins. Painting an acrylic seascape isn't a single act but a patient, layered process. Each coat of paint you apply builds on the one before it, creating the depth, light, and atmosphere that make an ocean scene feel real. This methodical approach gives the final piece a rich history and a genuine sense of place.
Your first marks are arguably the most critical. They set the emotional tone for everything that follows. An underpainting is far more than a simple sketch; it's the foundational glow that will shine through and influence every subsequent color.
Establishing a Warm Foundation
It’s tempting to dive right in with blues and greens when painting the ocean, but that’s a quick way to end up with a painting that feels cold and flat. I always start with a warm-toned underpainting, usually just a thin wash of a color like Burnt Sienna or maybe a warm yellow ochre.
This one step works wonders. As you layer the cool blues of the sky and sea over this warm base, tiny hints of that underlying color will peek through. This creates a subtle visual vibration known as simultaneous contrast, making the cool tones pop with more life and vibrancy. It’s like hiding a secret energy source within the canvas that makes the entire seascape glow.
Blocking In Your Core Shapes
After the underpainting is dry to the touch, it’s time to block in the largest shapes of your scene. Forget about details for now. The goal here is to establish the big masses of color and value—the sky, the main body of water, and any landforms. Grab a large, flat brush and lay down thin, even layers of your foundational colors.
Mix a general hue for the sky, another for the water, and a third for anything on the horizon. Think of it as creating a simplified color map of your painting.
- Define Light and Shadow: Figure out where your main light source is and block in the general areas of light and dark on the water and land.
- Check Color Harmony: This is the perfect time to make sure your foundational colors are working together. It’s easy to make adjustments at this early stage.
- Keep It Simple: Fight the urge to paint individual waves or clouds. Right now, you’re just building a solid, unified structure to work on top of.
This process breaks a complex scene down into manageable pieces, giving you the confidence to build up detail in the later stages. The structured approach, visualized below, shows how balance, focus, and line work together to create a cohesive foundation.
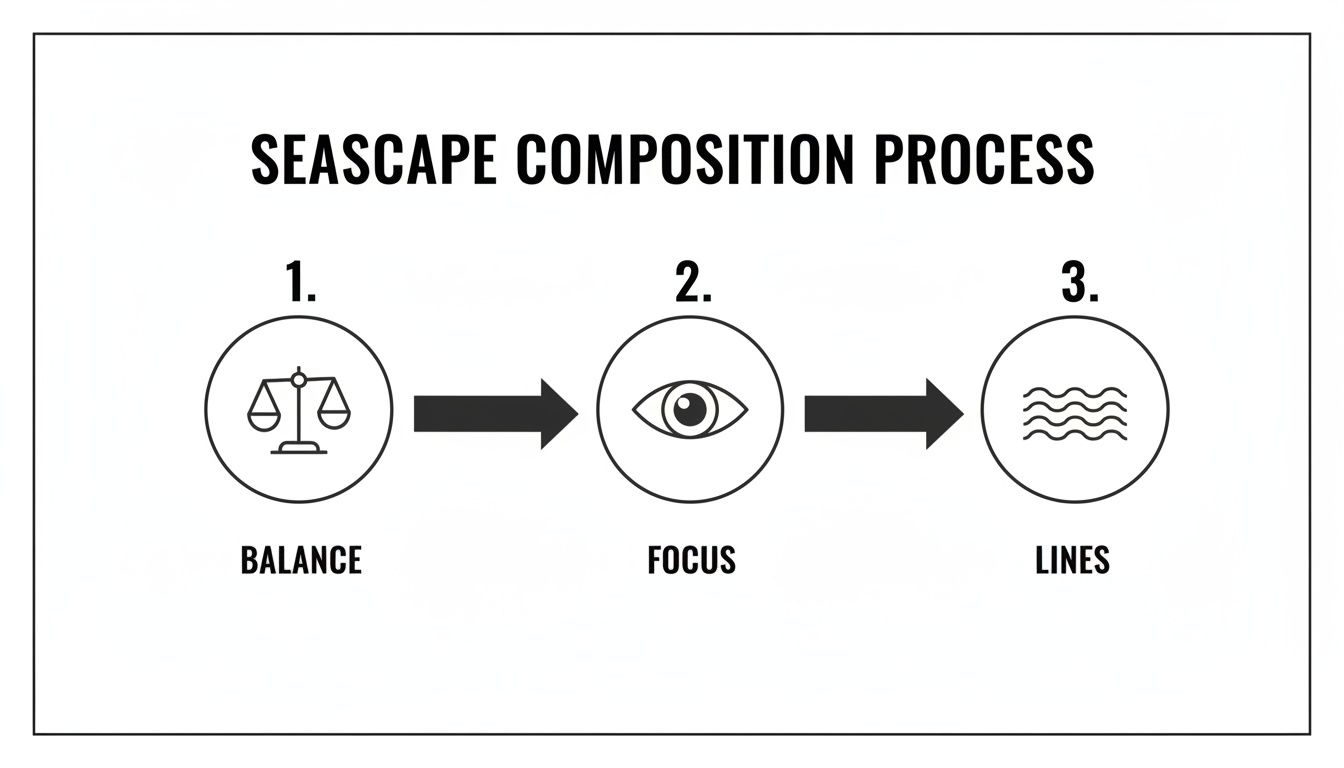
As you can see, these core principles provide the scaffolding for a painting that feels both dynamic and intentional from the very start.
Building Translucent Waves and Powerful Crests
With the foundational shapes in place, you can finally start sculpting the water. The secret to painting believable waves is remembering that water isn’t just blue; it’s a translucent medium that reflects, refracts, and absorbs light in complex ways.
To capture the face of a wave where light shines through, you’ll need to mix your blues and greens with more white or a lighter yellow. Apply this color thinly where the wave is rising and swelling. The fast-drying nature of artist-grade acrylics is a huge help here. This premium segment of the art supply market, valued at US$ 925.24 million in 2021, is projected to hit US$ 1,348.62 million by 2028. That growth is largely thanks to properties like rapid drying times—often under 30 minutes for a thin layer—which let us build up delicate, translucent layers without the colors turning to mud.
For the powerful crest of the wave, right where it’s about to break, your approach needs to change completely. This is where you bring in your thickest, most opaque paint.
The energy of a seascape is often concentrated in the breaking wave. Use bold, confident brushstrokes with Titanium White, perhaps slightly tinted with blue or yellow, to capture the explosive force of the water. Let the texture of the paint do some of the work for you.
Vary your brushwork. A quick flick of a small brush can suggest sea spray, while a thick application with a palette knife can carve out the foamy edge. It’s this interplay between thin, glowing layers and thick, opaque crests that creates the illusion of moving water.
Rendering Authentic Seafoam and Spray
Seafoam is one of the most challenging—and rewarding—parts of painting the ocean. A common mistake is to just paint it as a flat, solid white shape. But real seafoam is a delicate, intricate web of bubbles, water, and air.
To get an authentic look, you have to think in layers of opacity and texture.
- First, map out the shape with a thin, slightly off-white wash (Titanium White with a hint of gray or light blue). This blocks in the general pattern of the foam on the water’s surface.
- Next, add texture. I like to use a stiff-bristled brush, a sea sponge, or even a wadded-up paper towel to dab on thicker, more opaque white. Focus this texture on the chunkiest parts of the foam and let the edges stay soft.
- Finally, refine with detail. Switch to a small, fine-tipped brush. Use slightly thinned white paint to draw in the lacy, web-like patterns at the edges where the foam thins out and dissipates into the water.
This layered approach is what brings the foam to life. Each application—from thin washes to textured dabs and fine lines—contributes to a final result that feels dynamic. For more ideas on getting those subtle shifts in tone just right, you might find our articles on color mixing useful.
To help you keep these stages organized, here's a quick reference table outlining the entire process.
Seascape Painting Stages At a Glance
The table below summarizes the core phases of building an acrylic seascape, from the initial foundation to the final, expressive details. Think of it as a roadmap for your painting journey.
| Painting Stage | Primary Objective | Key Techniques |
|---|---|---|
| Warm Underpainting | To establish a luminous base and create color harmony. | Applying a thin wash of a warm color like Burnt Sienna. |
| Blocking In Shapes | To map out the main compositional elements and values. | Using a large brush to apply flat, simplified color masses. |
| Building Waves | To create the illusion of translucent, moving water. | Layering thin, light-toned glazes with thick, opaque paint for crests. |
| Rendering Foam & Spray | To add realism and capture the energy of the water. | Using a multi-layered approach with washes, dabbing, and fine lines. |
| Adding Details | To refine the painting and create focal points. | Using small brushes for highlights, shadows, and textural elements. |
Following these stages in order provides a reliable structure, allowing you to build complexity and depth with confidence rather than getting lost in the details too early.
Mastering Light and Texture in Acrylic Seascapes
The soul of a truly moving seascape is in its sensory details—the rough texture of a rocky shore set against the soft glow of light on water. Moving beyond flat color is what elevates a painting from a simple depiction to an immersive experience. This is where you invite the viewer to feel the sea spray and hear the waves.
To master these elements, you have to learn to see with your hands as much as with your eyes. We'll get into the practical techniques that add physical dimension and luminous depth, transforming your canvas into a world the viewer can almost step into.
Sculpting Form with a Palette Knife
While brushes are essential, a palette knife is my secret weapon for injecting raw, physical energy into a painting. Its rigid edge lets you apply thick, buttery paint to create tangible form, which is especially effective for rendering the rugged, weathered surfaces you find along a coastline.
Think of it less like painting and more like sculpting. When I'm working on a rocky outcrop, I'll load my knife with a mix of Burnt Sienna, Ultramarine Blue, and a touch of white. I then press and drag it across the canvas, letting the paint break and skip. This instantly mimics the natural cracks and planes of a rock face.
This simple technique adds a three-dimensional quality a brushstroke just can't match. The raised edges of the paint catch actual light, creating real highlights and shadows that shift as you walk past the painting.
Capturing Fleeting Light with Glazes
Light on water is never static; it’s a fleeting, ephemeral dance. One of the best ways to capture this quality is through glazing. A glaze is just a very thin, transparent layer of paint that you apply over a dry layer, which subtly alters the color and value underneath.
For instance, to create the warm, golden light of a sunset on the water's surface, I'll start with my base water colors already blocked in and dry. I then mix a tiny amount of Cadmium Yellow or Alizarin Crimson into a clear acrylic glazing medium. Applying this transparent wash over the areas where the light hits instantly warms the water without covering up the underlying detail. For a deeper dive into this, check out our guide on how to paint water reflections.
This same method works beautifully for shadows. A thin glaze of Phthalo Blue can deepen the cool, dark trough of a wave, adding a profound sense of depth and volume. Glazing builds luminosity layer by layer, creating a glow that seems to come from within the painting itself.
Using Mediums to Build Ocean Texture
Sometimes, you need more body than paint alone can provide. This is where acrylic mediums come in. They are the secret to building substantial texture, especially for churning waves and thick seafoam.
- Heavy Gel Medium: Mixing this thick, paste-like medium with your white paint allows you to build the crest of a wave into a physical peak. It holds its shape perfectly, creating a tangible edge that adds incredible realism.
- Modeling Paste: Even thicker than gel, modeling paste can be applied directly to the canvas and sculpted with a knife before you even add color. Once it's dry, you can paint over it to create the solid, gritty texture of wet sand or barnacle-covered rocks.
By incorporating mediums, you are no longer just creating an illusion of texture—you are creating actual texture. This multi-sensory approach is what makes a seascape truly compelling, inviting the viewer to engage with the work on a deeper, more physical level.
Finishing Touches with Dry Brushing
After building up thick textures and deep glazes, a final, delicate touch is often exactly what’s needed. Dry brushing is a technique where you use a stiff brush with very little paint on it, lightly skimming it across the raised surfaces of your painting.
This is my favorite method for suggesting sea mist or the fine spray coming off a crashing wave. I'll load a fan brush with a tiny bit of Titanium White, wipe most of it off on a paper towel, and then gently dust it over the dark, shadowy parts of the water. The paint only catches on the highest peaks of the canvas texture, creating a light, airy effect that is incredibly realistic.
The market for acrylics is growing, largely driven by a desire for the kind of expressive, ocean-inspired art we're discussing. Part of this is a significant shift toward low-VOC, eco-friendly acrylics, now preferred by 65% of consumers. This aligns with my own non-toxic approach, influenced by my grandmother's lessons. With 40% of interior designers using sea-inspired art, acrylics offer a sustainable way for artists to meet this demand. You can explore more about the art market's growth on GlobeNewswire.
Finishing and Protecting Your Artwork
When you put your brushes down, the painting might be done, but the artwork isn't finished. The final stage is all about protecting your hard work, making sure your seascape not only survives but looks its absolute best for years to come. This step is a crucial one, shielding the piece from damage and dramatically enhancing its final appearance.
The most important part of this process is varnishing. A good varnish creates a tough, non-porous layer that guards against dust, grime, and—most importantly—the UV light that causes colors to fade. It’s an archival-quality finish that locks in the vibrancy of your pigments for the long haul.
Selecting the Right Varnish Sheen
The varnish you choose is more than just a protective coat; it's an artistic decision that will have a huge impact on the final mood of your seascape. Each finish plays with light in its own way.
- Gloss Varnish: This is my personal favorite for most of my seascapes. It creates a saturated, almost wet look that makes the colors and darks incredibly rich. It beautifully mimics the reflective quality of water, making the whole painting feel more luminous and alive.
- Satin Varnish: If you want something a little more subtle, satin is the perfect middle ground. It offers a soft luster that cuts down on glare while still giving your colors a nice pop. This finish has a clean, contemporary feel that works well on pieces that have a lot of texture.
- Matte Varnish: A matte finish gives you a completely flat, non-reflective surface. This can be perfect for paintings with a soft, foggy, or atmospheric quality. Just be mindful that matte varnishes can sometimes slightly lighten your darkest values, which might flatten the overall contrast a bit.
Choosing a varnish is the final artistic decision you make. Consider how the finish will interact with your specific painting. A gloss finish on a turbulent, wave-crashing scene can amplify its energy, while a satin finish might better suit a calm, misty morning.
The Correct Varnishing Process
Applying varnish isn't something to be rushed. A hasty job can leave you with streaks, bubbles, or a patchy sheen that can really detract from the painting you’ve spent so much time on.
First things first, your painting must be completely dry. I can't stress this enough. Acrylics might feel dry to the touch within hours, but the paint needs time to fully cure. I always wait at least 72 hours, but a full week in a dry, low-humidity room is even better.
Next, find a clean, dust-free space to work. Lay your painting flat on a table, maybe propped up on a couple of blocks of wood. Give the surface a gentle wipe with a soft, lint-free cloth to get rid of any dust that might have settled.
When you're ready to apply, use a wide, soft brush that you keep just for varnishing. Pour a little varnish into a clean container and brush it on in long, even strokes. Work your way methodically from one side of the canvas to the other, overlapping each stroke just a bit to ensure you don't miss any spots.
Let that first coat dry completely—check the manufacturer's instructions, but it's usually a few hours. For a flawless finish, I always apply a second coat. If you brushed the first coat on horizontally, apply the second one vertically. This cross-hatching technique helps eliminate any chance of streaks.
Photographing Your Finished Seascape
Once your painting is varnished and fully cured, you’ll want to get some great photos to share online or add to your portfolio. Good lighting is everything. I find that natural, indirect daylight is always the best option. Try setting your painting up near a large window, but make sure it’s not in the direct path of the sun, which can cause harsh glare.
To avoid distorting the painting's proportions, position your camera so it’s perfectly parallel to the canvas. A tripod is your best friend here; it keeps the camera steady and ensures your images are tack-sharp. Take a few different shots and when it comes to editing, less is more. Your only goal should be to make the photo on your screen look as close as possible to the real-life painting in terms of color and contrast. This ensures you're representing your work accurately and professionally.
Common Questions on Painting Seascapes With Acrylics
Even the most seasoned painter runs into a few snags when working with the sea as a subject. The ocean's constant motion, combined with the quick-drying nature of acrylics, can certainly throw some curveballs. Let's tackle some of the most common questions I hear from other artists.
Think of these as conversations in the studio—practical answers to get you past the sticking points and back to painting with confidence.
How Do I Keep My Acrylics From Drying Too Fast When Blending?
This is probably the number one frustration with acrylics. You're trying to get that gorgeous, seamless sky gradient, and the paint starts getting tacky before you’re ready. It’s a classic problem, but thankfully, one with several solutions.
My go-to method is adding an acrylic retarder or a slow-drying medium to my paints. You only need a tiny drop mixed in on your palette, but it works wonders, giving you those crucial extra minutes to work the paint and soften your blends.
Another simple trick is to keep your painting surface just slightly damp.
- A fine mist spray bottle is your best friend here. A light spritz over your working area keeps the paint workable.
- This little bit of moisture allows for much softer, more forgiving edges.
- I also recommend working on large areas like skies in smaller, more manageable sections. Perfect the blend in one part before moving to the next.
Also, consider using fluid acrylics. Their lower viscosity means they naturally stay open a bit longer than their heavy-body counterparts, which can be a real advantage for smooth transitions.
What Is the Best Way to Paint Realistic Seafoam?
Seafoam is all about texture and layers. If you just paint a flat, white shape, it will always look stuck on. You need to create the illusion of all that air and bubbling water.
I always start by lightly sketching the foam's main shape with a very thin wash of an off-white—think Titanium White with a touch of gray or pale blue. This layer just maps out the pattern without being too harsh.
Now for the fun part: building texture. Grab a stiff-bristled brush, a natural sea sponge, or even a wadded-up paper towel. Use it to dab on thicker, more opaque white. Concentrate this texture where the foam is thickest and let the edges fade out.
The real magic of seafoam is in the contrast between its dense, bubbly core and its delicate, lacy edges. Resist the urge to create a solid white blob. Let some of that beautiful water color peek through.
For the finishing touches, I'll switch to a small round brush. With some slightly thinned white paint, I'll carefully draw in those fine, web-like tendrils where the foam stretches and dissolves into the water. Combining these different applications is what creates that believable sense of depth and movement. For more ideas, take a look at the various approaches in our gallery of acrylic seascapes.
How Can I Make My Seascape Colors More Vibrant?
If your colors are looking a bit dull or muddy, the culprit is often over-blending, especially with complementary colors, right there on the canvas. A much better approach is to mix your colors thoroughly on the palette first. Then, apply them with clean, confident strokes.
The ground you paint on also makes a huge difference. Starting with a warm-toned underpainting, like a thin glaze of Burnt Sienna, provides a beautiful contrast. It makes the cool blues and greens of the ocean practically jump off the canvas—they just feel more luminous.
Finally, don't underestimate the power of a final varnish. Once the painting is completely dry, a coat of gloss varnish will saturate all your colors, bringing back that rich, wet look they had when you first applied them. It’s a simple step that adds a professional, vibrant finish to your work.
At Skyler’s Art, we believe that every brushstroke is a form of storytelling. Explore our gallery to discover original, emotive seascapes that capture the soul of the ocean. Find your connection to the coast at https://skylers-art.org.
Article created using Outrank